How to make a Map Cabinet // Woodworking

Description
I made an awesome map cabinet for my family's photography studio!
Subscribe to my channel: http://bit.ly/1k8msFr
Second Channel: http://bit.ly/iltms-2
MORE PROJECTS, POSTS AND EVENTS
http://www.iliketomakestuff.com
MAP CABINET PLANS
www.iliketomakestuff.com/product/map-cabinet-digital-plans/
TOOLS & SUPPLIES (affiliate links):
https://kit.com/iliketomakestuff/map-cabinet
https://kit.com/iliketomakestuff/shop-safety-gear
Twitch Stream Every Wednesday @ 11am EST: www.twitch.tv/iliketomakestuff
I WROTE A BOOK!!
http://www.iliketomakestuff.com/makingtime
Want to support ILTMS? Get exclusive content and more...
http://www.iliketomakestuff.com/patreon
BUY A SHIRT, STICKER, DIGITAL PLANS and MORE!!
http://www.iliketomakestuff.com/store
FOLLOW:
http://twitter.com/iliketomakestuf
http://www.twitch.tv/iliketomakestuff
http://instagram.com/iliketomakestuff
http://facebook.com/iltms
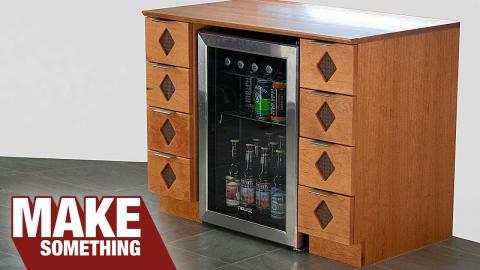
My brother and sister-in-law own a photography studio and they print all of their portraits in house. I was asked to make a cabinet to hold the prints that are ready for pick-up. We decided on a traditional-looking map cabinet, but have more shelves than drawers. Here's how to make a map cabinet.
I created a Fusion 360 model of the map cabinet so that my brother and sister-in-law could approve the design. The model provided dimensions to cut and assemble the map cabinet case. I built the side supports by cutting down a 1x4 pine board and assembling the rectangular side frames using my pocket hole jig. Then I used my router and a rabbeting bit to create a slot for the thinner plywood side panel. These side frames were attached to the plywood bottom, again, using pocket screws. The plywood top extends out over the front and sides but not the back. This cabinet will sit against the wall, so a decorative overhang on that side of the map cabinet was unnecessary. The top was also attached to the sides and the case to the 1x4 base with,you guessed it, pocket holes.
My brother and sister-in-law had a paint color already in mind to match their studio, so painting was pretty simple. Josh and I used some small rollers to apply 2 coats of the dark blue eggshell paint. I chose this type of paint because it isn't terribly durable. They wanted it to look a bit worn, so naturally over time it will get dinged and the paint will scuff. Once they are happy with the level of distress, they will apply a clear coat to lock in the look.
The shelves were relatively easy do make. I cut some 3/4 inch plywood making sure to leave enough room for a 3/4 inch band of pine on the front edge. Rather than making the shelves adjustable like on my Simple Bookcase, I secured them in place using pocket screws. If you wanted didn't want dedicated spacing between the shelves, then you could totally use a shelf pinning jig to make the spacing adjustable. It is important to note that I did paint the shelves before mounting them in the map cabinet. The thinner gaps between the shelves would make it a nightmare to paint afterward.
To cover the back of the map cabinet, I used a sheet of 1/8 inch thick luan plywood. I cut this piece to fit over the back, making sure to overlap the sides, bottom, and top by just a little bit. Small brad nails were used to secure the back in place, but small staples would also work. We also painted the luan sheet before attaching it to the map cabinet.
I really hope you liked this project, I know my brother and sister-in-law are really excited to have a new addition to their photography studio and it looks amazing in the space. It is a simple project that really adds some dimension to an interior design and can give your space a unique look. If you liked this woodworking project, you'll love some more of my projects!


Comments