How to 3d Print & Cast a "Neon Sign"

Description
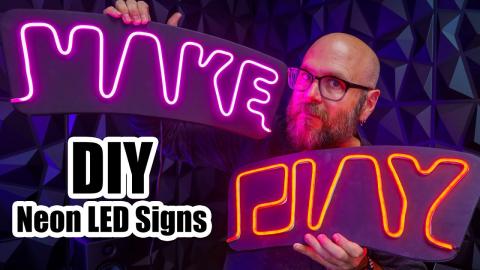
I always wanted to try and make a faux neon sign out of resin and embedded EL wire. Come see how it turned out!
Subscribe to my channel: http://bit.ly/1k8msFr
Second Channel: http://bit.ly/iltms-2
MORE PROJECTS, POSTS AND EVENTS
http://www.iliketomakestuff.com
TOOLS & SUPPLIES (affiliate links):
https://kit.com/iliketomakestuff/resin-neon-sign
https://kit.com/iliketomakestuff/shop-safety-gear
Twitch Stream Every Wednesday @ 3pm EST: www.twitch.tv/iliketomakestuff
I WROTE A BOOK!!
http://www.iliketomakestuff.com/makingtime
Want to support ILTMS? Get exclusive content and more...
http://www.iliketomakestuff.com/patreon
BUY A SHIRT, STICKER, NOTEBOOK, DIGITAL PLANS and MORE!!
http://www.iliketomakestuff.com/store
FOLLOW:
http://twitter.com/iliketomakestuf
http://www.twitch.tv/iliketomakestuff
http://instagram.com/iliketomakestuff
http://facebook.com/iltms
MUSIC: http://share.epidemicsound.com/iltms
This project was an exercise in "order of operations." By that, I mean, you have to figure out which pieces of this puzzle had to be done in the right order to ensure that we end up with a finished product. This build involved the 3d printer, some epoxy resin, way too much silicone, and some electronic components. And since I'm making this up as I go, I had to step back and think through the madness before I made some potentially costly errors.
First, I need to get an idea of what the sign will look like. To no surprise, I wanted to use the ILTMS "M" logo for this neon sign. I modeled that shape in Fusion 360 and printed it out using the Taz 6 3d printer. To connect the segments of the "M" and to give the EL wire a place to continuously wrap though, I added some little bridges to the model. Now that I have the completed "positive" I can make a small box to contain the silicone that will be poured over it.
To make the box to contain the silicone, I used some corrugated plastic sheets (stuff used in political signs). I laid down the 3d printed positive and measured out a box around it. Being careful to only cut half-way through the material, I folded up the unbroken sides into a walled box. Hot glue was added to seal up any remaining cut lines and to ensure the box was water-tight. I used the same hot glue to secure the flat bottom of the 3d printed positive to the floor of the box.
It was time to pour the silicone, which I already had on hand from a project a while back. "A while back" is important here, because apparently silicon can go bad when stored on a shelf for over a year. When I went to pour part one of the the 2-part mixture, it came out much denser and harder than it should have. It should have poured out like a thick syrup, instead I had to scrape it out in a molten-rubber-ball consistency. I went ahead with the mixture and used my vacuum chamber to free any bubbles. This wasn't working because the silicone mixture was way to thick to release anything trapped inside.
Needless to say, this batch of silicone wasn't working, so I bought a new, fresh kit that mixed together just fine. Once I had a good consistent color, I poured the silicone over the positive making sure to cover the entire model. The next day, the silicone had cure and I simply pealed the box apart and removed the positive from the mold.
For this project, I used a brand of epoxy resin that could be poured in larger quantities. I mixed the two parts together until they were clear and poured an even stream down into the silicone mold. We talked about different resins and how to pour them in a Bits video if you're interested. We let this resin cure for almost two full days. Because you can pour this type of epoxy resin in larger batches, it cures very slowly and doesn't produce much heat.
I probably could have found a clever way to embed the EL wire into the resin while it was curing, but I thought it would be messy and inconsistent. Instead, I waited until the resin was cured and used a Dremel tool to carve in a small channel into the sign's flat back. I used a ball-nose bit to carve in the EL wire groove. Using some CA glue, I laid in the wire and traced all the way around the logo. I did have to double up in some places to complete the circles but it looked really cool. You can cut off access EL wire without it affecting the function of the line touching the battery, so I trimmed off the remaining bit.
The wire, although not super bright, looked really cool. The resin acted as a diffuser and it lit up pretty nicely. To give some support and color contrast, I mounted the sign to an orange piece of acrylic I had and mounted it to the wall. The fake neon sign totally worked! It was an experiment in mold making, casting, and problem solving. I am very happy with how this turned out and I hope this inspired you to try something similar.