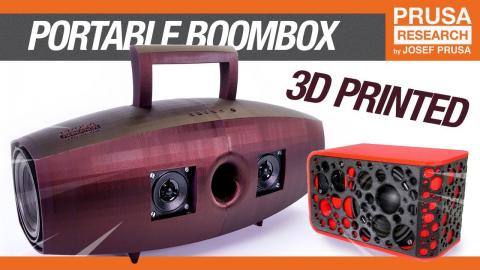
How to make a "Soundwave" Bluetooth BoomBox

Description
I made a Bluetooth Boombox that looks like Soundwave!!
Click http://www.dashlane.com/make and use my promo code ‘make’ to get 10% off your Dashlane Premium subscription!
Subscribe to my channel: http://bit.ly/1k8msFr
Second Channel: http://bit.ly/iltms-2
MORE PROJECTS, POSTS AND EVENTS
http://www.iliketomakestuff.com
TOOLS & SUPPLIES (affiliate links):
https://kit.com/iliketomakestuff/soundwave-bluetooth-boombox
https://kit.com/iliketomakestuff/my-woodworking-tools
https://kit.com/iliketomakestuff/digital-fabrication-tools-3d-printing-laser-cnc
https://kit.com/iliketomakestuff/shop-safety-gear
Twitch Stream Every Wednesday @ 3pm EST: www.twitch.tv/iliketomakestuff
I WROTE A BOOK!!
http://www.iliketomakestuff.com/makingtime
Want to support ILTMS? Get exclusive content and more...
http://www.iliketomakestuff.com/patreon
BUY A SHIRT, STICKER, NOTEBOOK, DIGITAL PLANS and MORE!!
http://www.iliketomakestuff.com/store
FOLLOW:
http://twitter.com/iliketomakestuf
http://www.twitch.tv/iliketomakestuff
http://instagram.com/iliketomakestuff
http://facebook.com/iltms
MUSIC: http://share.epidemicsound.com/iltms
I began the project by designing the most iconic element of the boombox, the Soundwave face. I traced a picture of the 80's toy in Fusion 360 so that I could export those cut lines out to the CNC. You don't have to do this step if you don't have access to the CNC, you can very easily cut these panel details out of thin EVA foam or strips of thin wood.
I loaded the cut paths into Aspire, my CNC design software, and carved the the lines into a piece of 1/2" MDF. Again, whether you are making a crazy Transformers prop or another interesting boombox, you can add these details in a lot of ways.
The boombox's overall size was determined by the size of two speakers side-by-side. They would be mounted to a panel that is fit inside the finished boombox. I cut the top, bottom, and side panels on the table saw and attached them together with glue and brad nails. I also cut a back panel to complete the enclosure and attached it with some screws so I can access the speaker if needed.
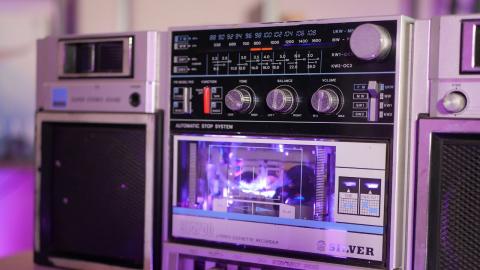
In the original toy, Soundwave has a space where the cassette tape robots would sit. I planned on cutting this hole out and covering it with black speaker cloth so that the speakers can project through this opening.
The speakers that I am using are meant to fit into the ceiling so they have screws and mounting tabs that tighten the speaker housings to a panel from the front. To attach them to the boombox, I cut two holes in a 1/2" panel and dropped them in. Tightening the mounting screws drew those tabs forward and secured the speakers in place.
I connected the speaker wires to the bluetooth module and mounted that to the panel as well. To power the whole system, I had to drill a small hole in the back panel for the power cord. Once plugged in, they easily connected to my phone and I was able to crank up the jams.
Now that the speakers are mounted and the bluetooth pairing was successful, it was time to finish up the rest of the prop details. To match the 80's toy as close as possible, I used metallic silver spray paint and a deep blue for the color scheme. Some of the detail pieces like the red light and the eject button were 3d printed, while the volume wheel and the slide were cut out of EVA foam. You could hand-paint them, but I used my vinyl cutter to match the cassette-player's labels.
The Decepticon emblem was printed in Matterhackers' Pro Series PLA in Lilac Pastel, a perfect match for the original color, and mounted on a silver plate also printed in PLA. The emblem was mounted to the speaker cloth with CA glue and supported from behind with an MDF brace.
Overall, this was a simple speaker enclosure that was decorated in a fun and nostalgic way. These bluetooth speakers were super simple to mount and setup and they are really loud. I was really happy with the look of the boombox and I hope I was able to show that you don't need really fancy tool to make it, although using a CNC and a 3d printer make the whole project cleaner and faster.
I hope this inspired you to add some bluetooth speakers to a project, maybe some for your yard or for an indoor theater. This kit can easily pair with an Amazon Echo so you can connect multiple IoT devices together in your home. If you liked the prop-making aspect of this project, I have made many Transformers-related builds in the past you can check out too!