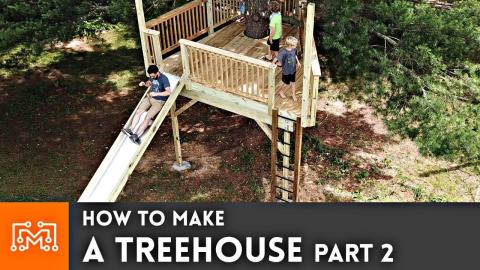
How to Make a Treehouse Part 1

Description
I've always wanted to build a tree house, and thanks to Lowe's, we're finally able to make that happen! In part 1 of 2, we are building a sturdy platform for the treehouse that you can build too! This project was sponsored by Lowe's, check out the links below for the products we used!
Subscribe to my channel: http://bit.ly/1k8msFr
Second Channel: http://bit.ly/iltms-2
MORE PROJECTS, POSTS AND EVENTS
http://www.iliketomakestuff.com
TOOLS & SUPPLIES (affiliate links):
Craftsman 60-volt Chainsaw: https://low.es/2RqSo9W
Werner Mtiaa Folding Ladder: https://low.es/2N0wQTi
DeWalt Hammer Drill: https://low.es/2KvGn2n
Craftsman 24" Adjustable Wrench: https://low.es/2IVcNQX
Sakcrete 80 lb Bag: https://low.es/2Y0W5pn
Line Level: https://low.es/2Rqa05R
Joist Hangers: https://low.es/31NWTjJ
Double Clip Brackets: https://low.es/2x5suzl
Rafter Ties: https://low.es/2ISgyGI
Hillman 5-in Lag Screws: https://low.es/2Ruof9R
Deck Plus 3-in Decking Screws: https://low.es/2L3KKBj
Treehouse Attachment Bolts: https://www.treehousesupplies.com/Treehouse_Bolts_s/41.htm
https://kit.com/iliketomakestuff/my-woodworking-tools
https://kit.com/iliketomakestuff/shop-safety-gear
I WROTE A BOOK!!
http://www.iliketomakestuff.com/makingtime
Want to support ILTMS? Get exclusive content and more...
http://www.iliketomakestuff.com/patreon
BUY A SHIRT, STICKER, NOTEBOOK, DIGITAL PLANS and MORE!!
http://www.iliketomakestuff.com/store
FOLLOW:
http://twitter.com/iliketomakestuf
http://www.twitch.tv/iliketomakestuff
http://instagram.com/iliketomakestuff
http://facebook.com/iltms
MUSIC: http://share.epidemicsound.com/iltms
There are many guides online to help you decide which tree is right for your treehouse. We used https://www.treetopbuilders.net/tree-selection/ to help confirm that the tree we were hoping to use was suitable for the job. The tree in question is a spruce tree with a 75 inch diameter, which should be plenty strong, even for a soft-wood tree. I had to remove some dangling limbs from the tree because it was struck by lightening many, many years ago. The tree house platform will occupy the space where those limbs used to be.
After a lot of research, I decided to use TABS, or Treehouse Attachment Bolts, to support one end of the treehouse platform and 2 wooden beams set into the ground to support the other; this way, the spruce tree isn't supporting the entire weight of the platform. The Tabs are massive bolts that are driven into the sides of the tree using larger drill bits and a wrench the size of a baseball bat. I marked the final height of the platform and subtracted the height of all of the supporting structures to give me the TAB location. I ordered the TAB equipment from TreehouseSupplies.com including the rented drill bits.
After attaching the TABs to the tree, I rented a two-person auger and drilled some huge holes in the ground. In these holes, we placed 4x4 beams and set them with Sakcrete. These two beams will be the uprights that will hold up the other end of the platform. We laminated two 2x10s and fixed them in between the two vertical beams.
To make the support platform for the treehouse, I used joist hangers to mount 2 2x10x to the face of the laminated header connected to the upright beams. The other end of these large pieces of lumber will sit on the TABs connected to the tree. I then mounted some 45-degree joist hangers to the face of the header and cut down some more 2x10s to connect the header corners to the 2x10s sitting on the TABs. We now had a triangular support system that was supported by the tree and by the vertical beams set into the ground. To add some additional lateral support, we added some knee braces to the inside of the vertical beams.
Now that the treehouse has a sturdy foundation, it is time to add the walking deck. Depending on the span of your support joists, you may be able to just lay down some decking material and call it good. In our case, I am going to build a deck frame made out of 2x8s and set them on top of the support joists. These decking frame pieces have a 16 inch spacing and hang over the support frame. We used decking brackets to attach the deck frame to the support frame.
Once the frame for the deck was in place and capped at the ends, we began to lay down the actual decking. All of this lumber was pressure treated so that it can withstand the outdoors. The decking boards were secured to the deck frame with 3 inch decking screws and spaced about 1/8 inch apart to allow for wood movement over time. I trimmed off the overhanging decking boards and the treehouse platform was all done!
Part 1 of this two-part project was just about making a sturdy platform for the rest of the treehouse. This platform construction allows you to have a blank canvas on which to build your treehouse. It could be an elevated deck or a fully-enclosed tiny house, it's all up to you. Big thanks to Lowe's for sponsoring this project. Stay tuned for Part 2!