How to Make an Indoor Climbing Wall

Description
I built my kids an indoor climbing wall, it was super fun to make!
Subscribe to my channel: http://bit.ly/1k8msFr
Second Channel: http://bit.ly/iltms-2
MORE PROJECTS, POSTS AND EVENTS
http://www.iliketomakestuff.com
TOOLS & SUPPLIES (affiliate links):
https://kit.com/iliketomakestuff/climbing-wall
https://kit.com/iliketomakestuff/shop-safety-gear
Twitch Stream Every Wednesday @ 11am EST: www.twitch.tv/iliketomakestuff
I WROTE A BOOK!!
http://www.iliketomakestuff.com/makingtime
Want to support ILTMS? Get exclusive content and more...
http://www.iliketomakestuff.com/patreon
BUY A SHIRT, STICKER, DIGITAL PLANS and MORE!!
http://www.iliketomakestuff.com/store
FOLLOW:
http://twitter.com/iliketomakestuf
http://www.twitch.tv/iliketomakestuff
http://instagram.com/iliketomakestuff
http://facebook.com/iltms
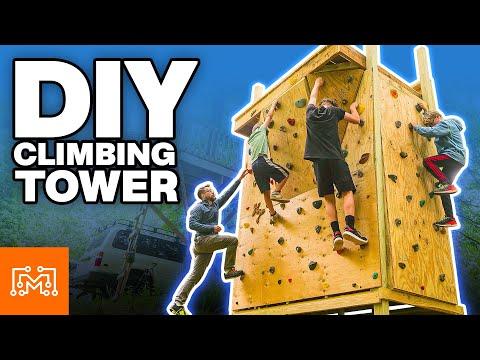
In our old house I built a huge climbing wall in our backyard. With the renovation of the boys' bedroom almost completed, I thought it was a perfect time to rebuild that fun rock wall in the their room.
First, here is a safety disclaimer...I built this wall for my kids in a manner that I am completely confident in. I don't know your room layout and I don't know your kids abilities. If you want to build a wall yourself, awesome! But you are assuming all responsibility and risk in doing so (that said, it is pretty awesome and you should go make one).
I began this project by measuring out the space in the room and making a digital copy of it (Its been very helpful for me lately), being sure to accurately measure the ceiling pitch. I then mapped out the placement of some drop-in, 2x4 walls that would support the 3/4 inch plywood faces. I cut and nailed the wall pieces together and screwed them to the existing room studs with some massive lag screws. I translated the ceiling pitch to the angled wall section and used a bird's mouth cut at the end of the 2x4 so that those joists would sit on the header of the wall below it.
Once the walls were framed in place, I broke down the sheets of 3/4 inch plywood to cover each section. I made sure to mark out the location of the new wall studs on the plywood so that I could secure them together, but it also helped me identify where to NOT place the holes for the climbing holds. On the plywood, I marked out a geometric grid that would become the locations for a bunch of T-nuts. These pronged nuts will receive the bolts that attach the climbing holds to the wall. The grid allows you to change up the arrangement later if you wanted. After drilling the grid holes and hammering in the T-nuts, we mounted each plywood face to the framed-in walls.
Accurately measuring the space was crucial when putting up the faces, each piece fit together in an angular puzzle that turned out amazing. All that was left to do was to place the climbing holds and bolt them to the T-nuts. This was pretty erratic, but it allowed for different skill levels in different areas. I even got to use the hand hold that I made using a silicone mold. After I throughly tested out the wall, I let my kids go nuts. They really love this new awesome addition to their room and I'm really happy they have an area to be wild and crazy kids. If you liked this project, check out more of my work using the links above!