Making a Canoe Carrier

Description
I made a way to easily move my canoe all by myself! Check out KiwiCo and get your first month free http://www.kiwico.com/ILTMS
Learn Fusion 360 with us at https://www.Fusion360formakers.com
Subscribe to my channel: http://bit.ly/1k8msFr
Second Channel: http://bit.ly/iltms-2
MORE PROJECTS, POSTS AND EVENTS
http://www.iliketomakestuff.com
TOOLS & SUPPLIES WE USED(affiliate links):
https://kit.co/iliketomakestuff/my-woodworking-tools
https://kit.co/iliketomakestuff/shop-safety-gear
WANT TO LEARN FUSION 360?
We made an online course called "Fusion 360 for Makers"
https://ilt.ms/fusion
I WROTE A BOOK!!
http://www.iliketomakestuff.com/makingtime
Want to support ILTMS? Get exclusive content and more...
http://www.iliketomakestuff.com/patreon
BUY A SHIRT, STICKER, NOTEBOOK, DIGITAL PLANS and MORE!!
http://www.iliketomakestuff.com/store
FOLLOW:
http://twitter.com/iliketomakestuf
http://www.twitch.tv/iliketomakestuff
http://instagram.com/iliketomakestuff
http://facebook.com/iltms
MUSIC: http://share.epidemicsound.com/iltms
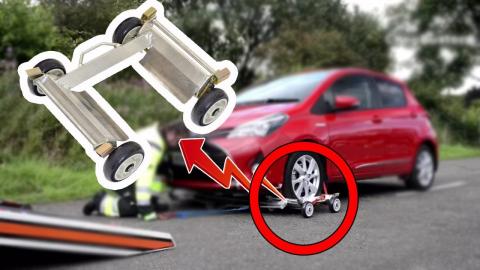
To solve this stagnant canoe issue, I ran through many possible scenarios. One was to have some wheel flip from a stowed position inside the canoe and lock outside when moving. I thought this would work well, but would take up too much room on the inside. For this first iteration, I decided to make a collapsible V-shaped bracket with two wheels that would attach to the horizontal runners, or thwarts. I also measure the height of the thwarts to the peaks of the bow and stern (front and back).
I measured the distance between the thwarts and transferred that gap to the floor of the metal shop. Using my metal-cutting bandsaw, I cut the lengths of tubing that will make up the triangular shape of the canoe carrier. The math here is pretty important. The sides had to be wide enough to span the thwarts and tall enough for the canoe to move freely on uneven terrain.
Now that the metal tubing was all cut to size, I used the MIG welder to attach them together. I also used a cool magnetic welding clamp called a MagSwitch to help align the tubing while I welded them. The two frame were welded in a way that allows the hinge points to be flat when open and extended. That means, the clamps were set to a 50 degree angle and welded together. For added lateral strength, I added some gussets to the corners of each leg frame. With these pieces done, it was time to add the hinge/axle mechanism.
The two leg panels will be connected at the bottom with a special hinge, which allows the canoe carrier to fold together. To make this, I took a length of steel pipe and cut it into three sections. Section one and three would be welded to one leg panel, while section two was welded to the other. This way, I could slide a large pin through each of them, allowing the unit to hinge. In this case, I used a length of 5/8" threaded rod as the pin which could also act as the wheel axle.
To mount the simple 13" wheels, I threaded on some nuts until they almost touched the frame. I then added the simple wheels to each side and adjusted the nuts outward until the wheel spun freely. The nuts were tack welded in place and another set were added to the front of the wheel locking them in place. At this point, the frame could hinge easily and the wheels spun freely. It was time to add the canoe connections.
To connect the canoe carrier to the thwarts, I used some scrap 90-degree steel beams welded together. This made a U-shape cup that could fit down over the thwart bars. I welded these two cup pieces to the leg frames and drilled some through holes into the side walls. The through holes are made for some captive pins. Once fitted onto the canoe, these pins will go under the thwarts and lock the canoe carrier in place. After a coat of red enamel paint for protection, the canoe carrier was ready.
I fully understand that I can buy a similar device to move the canoe. If you don't know this about me, I like to solve the problems I face with what I have on-hand. I was faced with the issue of not being able to easily move this old canoe down to the water. I looked around my shop and discovered that I had almost everything I needed to make it happen. While I do admit, that it is a little big to stow while underway, I believe this design is really solid and a second version would solve all of those issues. I'm really happy with how effortless it was to 1. actually solve this problem once I got started and 2. move this huge metal canoe by myself. I hope this project inspired you to tackle a problem you face in your life, rather than putting it off.