Making a Simple Potting Bench // Woodworking

Description
Since making the Raise Garden Beds, My wife has asked for a potting bench. Using simple construction, I made her a cedar potting bench with a built-in sink. We have plans linked below so you can make one too!
Subscribe to my channel: http://bit.ly/1k8msFr
Second Channel: http://bit.ly/iltms-2
GET THESE DIGITAL PLANS! https://iliketomakestuff.com/shop/product/potting-bench-digital-plans/
CHECK OUT OUR 3D MODELING COURSE! https://ilt.ms/fusion
RAISED GARDEN BEDS: https://youtu.be/ANyr-oP_QuY
MORE PROJECTS, POSTS AND EVENTS
http://www.iliketomakestuff.com
TOOLS & SUPPLIES WE USED(affiliate links):
https://kit.co/iliketomakestuff/simple-potting-bench
https://kit.co/iliketomakestuff/my-woodworking-tools
https://kit.co/iliketomakestuff/shop-safety-gear
I WROTE A BOOK!!
http://www.iliketomakestuff.com/makingtime
Want to support ILTMS? Get exclusive content and more...
http://www.iliketomakestuff.com/patreon
BUY A SHIRT, STICKER, NOTEBOOK, DIGITAL PLANS and MORE!!
http://www.iliketomakestuff.com/store
FOLLOW:
http://twitter.com/iliketomakestuf
http://www.twitch.tv/iliketomakestuff
http://instagram.com/iliketomakestuff
http://facebook.com/iltms
MUSIC: http://share.epidemicsound.com/iltms
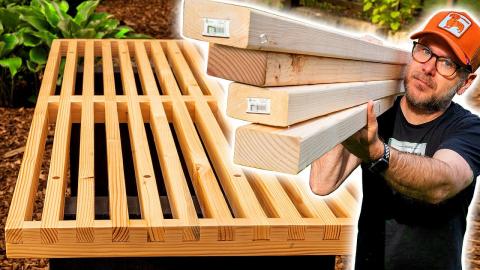
I designed this potting bench so you only needed to use one type of material. Because this bench will stay outdoors, I decided to use cedar. Dimensionally, cedar can get expensive, but by using fencing boards, this much cedar was very reasonable. The construction is quite simple, there will be two rectangular frames held vertically with 4 leg assemblies which will also hold a small shelf at the top.
To make the two frames, I connected the cut-down cedar with glue and screws. Be careful not to split the cedar close to the ends by driving in screws with a lot of pressure. Be sure to pre-drill your holes before driving in the decking screws. For the top frame, I am placing the two center supports in a specific location. I want to add a drainage sink to the workbench top to catch any overflow. The center supports need to be spaced so that they snuggly support the sink basin. I again secured these pieces with glue and screws.
Like I mentioned previously, the four leg assemblies will be made up of two pieces of cedar overlapped to make a 90-degree angle. I used glue and brad nails to secure these assemblies together. The front legs will stop at the top frame, which will eventually be the bench top. The back legs are longer and extend up the backside of the bench and will hold the simple shelf. I mounted the upper frame to the leg assemblies with more pre-drilled screws and glue. The bottom frame was attached in the same way but I placed it on a left-over piece of lumber to act as a spacer off the floor.
At this point, I could add the cedar pieces that make up the surfaces. I wasn't too precise about the spacing on either of the two platforms, I just tried to make the gaps uniform. On the top surface, I made sure the cedar boards went under the lip of the sink basin. Each surface board was screwed into the frame using coated decking screws.
When I say custom features, I mean things add to the overall build, but may not be necessary. At this point, even without the sink, you have a functional outdoor workbench. In our design, I added the taller back legs to support a shelf and to add space to add hanging tool storage. The shelf is the only piece of lumber that is different from the rest. It is wider than the decking boards just to give the shelf some more space. I cut down some simple triangles to act as supporting gussets and screwed the whole thing to the taller legs.
In the empty space beneath the shelf and above the work surface there is a lot of usable area. You can put pegboard or more cedar boards in this space and hang tolls on it, but I decided to use hardware cloth. Hardware cloth is a wire mesh with large open square spaces. I plan on using some s-hooks to hang tools on it. It is secured to the back of the bench using staples. The last thing to add to the bench is a drain in the sink basin. I purchased a sink drain, drilled the right sized hole and installed the drain. I don't have plumbing outside, so I plan on draining the overflow water into a bucket or a watering pot to use on the garden.
This potting bench is really simple to make, but it makes a great impact on the space. You could use a bench like this next to a grill, in a garage, or as a pop-up lemonade stand for your kids. It is really versatile. If you'd like to make one of these for yourself, click the link at the top to get some digital plans!