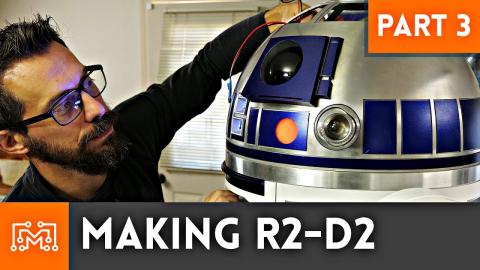
Making R2-D2 Part 2

Description
In this second installment of the Making R2-D2 series, I show you the painting process and start assembling the body and all the little panels. It is really coming together, come check out the progress.
Subscribe to my channel: http://bit.ly/1k8msFr
Second Channel: http://bit.ly/iltms-2
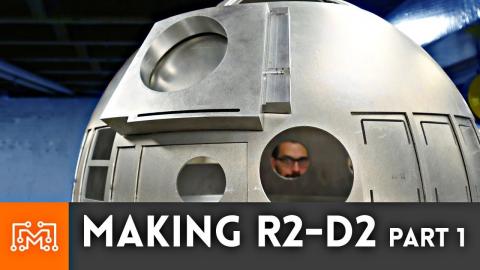
MAKING R2-D2 PART 1:
https://www.youtube.com/watch?v=JWgp7VSVJR8&t=3s
R2-D2 PARTS AND PLANS:
www.astromech.net
MORE PROJECTS, POSTS AND EVENTS
http://www.iliketomakestuff.com
TOOLS & SUPPLIES (affiliate links):
Green Spot Glazing Putty: https://amzn.to/2GGkYQR
Small Binder Clips: https://amzn.to/319ewcQ
https://kit.com/iliketomakestuff/my-woodworking-tools
https://kit.com/iliketomakestuff/shop-safety-gear
I WROTE A BOOK!!
http://www.iliketomakestuff.com/makingtime
Want to support ILTMS? Get exclusive content and more...
http://www.iliketomakestuff.com/patreon
BUY A SHIRT, STICKER, NOTEBOOK, DIGITAL PLANS and MORE!!
http://www.iliketomakestuff.com/store
FOLLOW:
http://twitter.com/iliketomakestuf
http://www.twitch.tv/iliketomakestuff
http://instagram.com/iliketomakestuff
http://facebook.com/iltms
MUSIC: http://share.epidemicsound.com/iltms
As you may have seen in Part 1 of this series, R2-D2's body is made up of a simple styrene frame covered with two layers of aluminum sheeting, or skins, with the appropriate cut outs already added. This duel-layer system allows for a white visible layer on top of the aluminum layer below. This give the subtle, metallic stroke around the door panels and also serves as offset openings that stop the doors from going into the body.
Before the two layers could be glued together, I had to paint the white sections. To do this, I used some self-etching primer made for aluminum to cover all of the areas needing to be painted white. On top of that primer, I painted a coat of grey primer and a final layer of satin white paint. Once dried, I used some E-600 glue to laminate the skins together and used some counter-sunk screws to attached the front and back skins to the styrene body frame.
R2-D2 has three legs in total, the two outer uprights and one retractable center legs that sticks out of the bottom of the body. To prepare this leg, I first had to assemble the skirt. The skirt is the transition piece from the cylindrical body that tapers gradually where the leg comes out. I 3d printed the components of the skirt and glued them together.
The ankle structure was assembled with layers of styrene, but when I fit the machined aluminum accents to it, I found that my original construction wasn't quite right. I was confident enough at this point that I could break apart parts of the ankle and remake it to the proper angle. All along the way, I used a green spot glazing putty to fill in any gaps or imperfections that could then be sanded smooth.
I had to do a lot of research into the "right" color for R2's blue parts. It isn't just a simple blue color, and there are differing opinions on how to best achieve that specific color. Some builders have used a combination of powder coating and machinist marking fluid, but I chose to use a rattle can of automotive paint recommended by someone on the Astromech forums. After the same primer treatment as the rest of the body, I painted the blue accent parts with the unique can of blue spray paint. They. Looked. Amazing.
One thing I did find after masking off parts and removing the tape after painting, was that the paint and primer combo I used tended to chip easily. The paint color is amazing, but the durability was not as expected. I have looked into the powder coating method, but I would have to completely strip the paint off of each part and start over. I am not sure if this is the route I'll go, but it is convenient to know that there are multiple options.
At this point in the project, the styrene frame is skinned front and back with the aluminum sheets that have been final painted. The specialty parts that were machined out of aluminum that I got from astromech.net have been painted blue in all of the appropriate spots and are ready to be mounted to the inside of the skins. All of these speciality parts have unique names, but these parts are all of the iconic R2-D2 torso elements. Most of them needed to be glued in place in their specific openings in the skins, and I again used E-600 to bond the metal to metal and the metal to plastic.
At this point, the leg assemblies need to be built, painted, and assembled. The components for the dome are painted blue and ready for assembly. The next part in this series will be putting those elements together and figuring out how to make the doors and compartment open electronically. Thank you for sticking through this build series. It is the project of a lifetime and it takes time and effort to get right. I hope this project inspires you to take on a bigger project and work on it bites at a time, you'll get there.