Making a Charging Station from Walnut & Brass

Description
With my 4 kids doing school at home lately, I've needed to make a charging station for all of their school computers. This project was made from materials I had on-hand and took a day to build. Go check out your scrap bin and make something awesome!
Subscribe to my channel: http://bit.ly/1k8msFr
Second Channel: http://bit.ly/iltms-2
MORE PROJECTS, POSTS AND EVENTS
http://www.iliketomakestuff.com
TOOLS & SUPPLIES WE USED(affiliate links):
https://kit.co/iliketomakestuff/my-woodworking-tools
https://kit.co/iliketomakestuff/shop-safety-gear
I WROTE A BOOK!!
http://www.iliketomakestuff.com/makingtime
Want to support ILTMS? Get exclusive content and more...
http://www.iliketomakestuff.com/patreon
BUY A SHIRT, STICKER, NOTEBOOK, DIGITAL PLANS and MORE!!
http://www.iliketomakestuff.com/store
FOLLOW:
http://twitter.com/iliketomakestuf
http://www.twitch.tv/iliketomakestuff
http://instagram.com/iliketomakestuff
http://facebook.com/iltms
MUSIC: http://share.epidemicsound.com/iltms
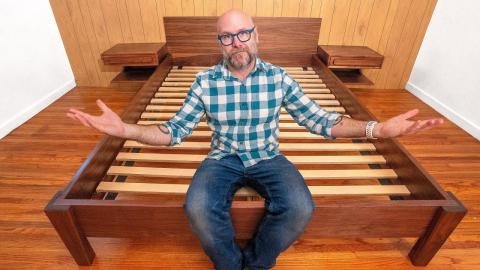
Due to social distancing right now, my whole team is working from home. That leaves me to produce and shoot the videos, just like in the old days. Another unfortunate result of the distancing is that I can't go to the store to get material for my upcoming projects. For this build, I'm using some left-over material I have on hand to solve our new laptop charging problem. Recently, I made a new Credenza out of walnut plywood and I have some offcuts left over. I decided that I could use some of these funky shaped pieces for our charging station and the odd shapes would actually help produce a cool visual style. Besides the 3/4" walnut plywood, I have some brass flat sheets and a length of 1/4" brass rod that I can use as accent pieces later on.
I know that a stack of dado blades is not easy to come by in a lot of places, but I really like using it to make that perfect little pocket for shelves and dividers. Starting with the taller side walls, I cut a dado across the middle that will hold the computer-holding shelf. Armed with a modified capital letter H, I planned on splitting up the center area into four separate stalls for the computers to sit. I measured out the exposed area and marked off three dado slots that I cut on the table saw. Perfectly, the three divider walls locked into place.
Now that the walls were structurally ready, I wanted to add that decorative design element to the charging station. Because of one of the scrap pieces, I decided to add a continuous slant to the front of the charging station. To ensure that the cut it the same across the five uprights, I bundled them together, justified to the top, with some tape and ran the stack through the bandsaw. Before I brought the pieces together, I applied some wipe-on polyurethane to the hard-to-reach areas. I used some walnut edge banding to cover the exposed edges and assembled the pieces using some glue and brad nails.
To add a little flare to this walnut box, I wanted to add some brass accents. In the upper computer-holding spaces, I needed to add a rear limit so the laptops don't push out of the back. After drilling some continuous holes through the uprights, I drove in the 1/4" brass rod to act as a rear stop. The chargers, an essential element in this charging station, were hot glued up into the lower space of the upper-case H. The opening of this space on the front of the charging station is open and you can see the nest of charging cables. Using some brass sheets, I cut a panel to cover this area. I marked and drilled four elongated holes so the USB-C plugs can come out the front and plug into the laptops. To add a matte finish to the brass, I used my orbital sander to lightly scuff up the front.
In most of my projects, I tend to make things more square and don't really care about visual aesthetics. In conclusion, the left-over material I used forced me to add a visual elements because of its off-cut shape. I was really pleased at how I was able to design this charging station around those pieces and it turned out super nice! It is really functional, the kids area using it every day. All four chargers are plugged into a power strip that plugs into the wall.
I hope you can go out into your shop and use some scrap material to solve a problem in your home. Right now, we all may not be able to go get exactly what we need, but we are resilient and creative and we can make it work!